Retro Station V1
Today marks a milestone in the retro station development. I have managed to successfully stuff all the retro fun I have been collecting into one desk area. While that doesn’t sound very exciting, it truly is for me. Having an area that is organized and functional means a lot to me. While the area itself seems rather traditional in appearance in terms of it being on an old bedroom desk, a lot of trial and error went into creating this functional setup.
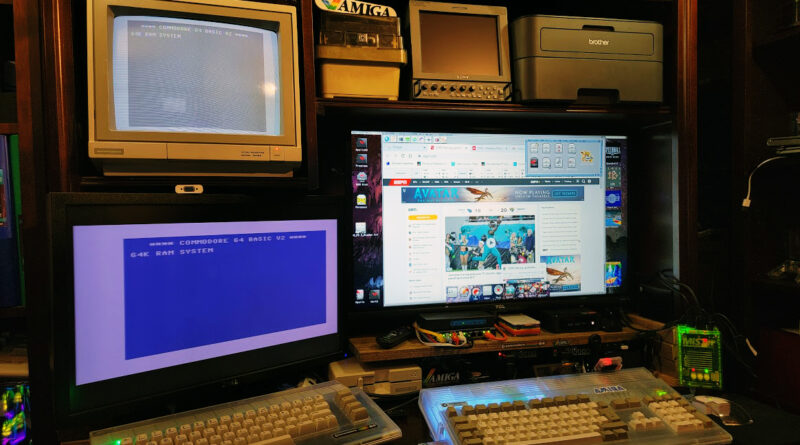
Let’s go over what it is that I have packed into this small space! An Amiga 1200, A Commodore 64C W/Chamelon – Commodore 1571 Floppy Drive – SD2IEC Commodore 1541 Disk Drive Emulator SD Card – Pi1541 HAT – Commodore 1902A Monitor, a Apollo Vampire V4 SA, a Raspberry PI4 (Amiberry), Tricked out MiSTer with 4TB HD, 2 Scart Video Converters, a 32″ ROKU TV, a Dell UltraSharp 24″ Widescreen LCD U2410F, 2 KVM’s, a 5 way HDMI Video Switch, a 8 Port 1Gh network switch, a Beelink 6-Core AMD Ryzen 5 5600H Mini PC SER5 Mini PC and a Sony 9″ Trinitron Color CRT Monitor. Last but not least, countless cables interfacing it all together.
Why all this $h1t? Think of it as a big old boy playground! The fun that can come forth from such a mass of retro computing devices is endless if you think about it. If you read the about post, then you know that these represent the retro platforms I loved most with some new retro horizons to explore with the MiSTer.
While the VIC 20 was mu actual first computer, the C64 was my second and where I really got rolling with computers. I was obsessed with my C64 and spent entirely too much of my free time lost in exploring and playing. Lots of memories and nostalgia.
The Amiga 1200 is for the classic Amiga experience, the last Amiga I owned was an Amiga 1200 and I used the hell out of it both for fun and even professionally doing commercial Desktop Publishing work for a local advertiser with work published in the newspaper, magazines and brochures. Prior to the 1200 I first owned an A500 and then an Amiga 2500 with IBM bridgeboard.
The PI is for various emulations. It runs Amiberry and a C128 Emulation. I have a SD Card switch coming for it to make it easy to switch. You will be able to read about these adventures in the future. The C128 was a computer I used very little so I have bit to learn there.
The Apollo Vampire V4 Strand Alone is a modern FPGA take on the classic Amiga platform. The Field Programmable Gate Array (FPGA) is an integrated circuit that consists of internal hardware blocks with user-programmable interconnects to customize operation for a specific application. In easy speak it is a programable chip that can emulate full hardware inside the chip. Designers can prototype and emulate hardware by coding it into the chip without the need for physical IC chips and hardware. Sounds magical doesn’t it? It really is, I have been benefiting from FPGA design for over 10 years now. Software defined radio, sound, and computing is truly revolutionizing design and implementation. The team at Apollo was actually able to design and implement a non existent Motorola CPU – 68080 in the FPGA as well as reverse engineer and improve the Amiga custom chips. While 8/16 bit computing are technologies of the past they live on and evolve in FPGA implementations. The Apollo Vampire series of devices are splendid!
MiSTer is another FPGA platform, its call to fame is its robust development teams that have literally reimplemented several retro platforms in what are referred to as cores. There are cores for NES, Sega, Sony PS, Commodore, Sinclair, Amstrad, Acorn and scores more available to run on this one device. Hop into your time machine and go way back to enjoy all your favorite consoles and computer you grew up with. Why wouldn’t you want one?
The Mini PC is more or less a slave to all of this. Cores can be downloaded, SD and CF Cards can be prepped and loaded on the PC. Its also a slave to my Amigas via VNC allowing me to add some modern features to the older platforms that cant keep up with the modern heavy bloated internet. Amiga UAE is also run here and Amikit to prep disk images for the Amigas.
How is it all wired together? Grab some coffee, this may get a little harry and winded. I will do my best to keep it simple, despite it being anything but that!
Video Management – First its important to understand that when mixing modern day emulators with the real genuine original hardware, not just any displays will work. While some of the FPGA, PI, and PC based emulators work fine on modern displays, the retro original devices are more particular. The Amiga and C64 work relatively low resolution devices back in the day. Dedicated Monitor Displays barely existed and with the primary audience being regular household consumers, TV’s needed to be the original target. This meant much lower frequencies for the displays like 15hz.
When this was first being put together I just purchased dedicated conversion boxes to take the RGB output from the C64 and Amiga that could convert the signals to be fairly compatible with the 32″ 1080P TV. Why that TV? To be honest, because it was cheap and 1080P. 1080P is a good match for retro computing devices. Also, 4K TV is a bit of a waste as for the most part, even with modern upgrades these computers will top out at 1200×600 resolution best case. IE, your going to get a small picture on a big high resolution screen, or you are going to stretch that picture into a rather ugly highly pixelated mess.
Along with the TV I wanted some old school displays, hence the old Commodore 1902A and Sony Trinitron 9″ CRT. The 1902A was really meant for the Commodore 128 when it was released and the Sony comes from the older video production world and can handle composite RGB video natively which I hope to play with more later. That display has been tested, however, in Phase 1 its disconnected right now.
The dell was chose because it is an older multisync digital display capable of the low 15hz display and a myriad of resolutions up to roughly 1150×860. This serves as a digital display to run in parallel with the 1902A on the Commodore 64 platforms.
The displays are hooked up as follows; there are direct connections, connections through SCART/Conversion Boxes, and connections through a 5 Way HDMI Switch. In some cases they route through both he SCART/Conversion Box and the 5 Way HDMI Switch.
While the direct connect simply means it outputs from the computer directly to a display, the SCART/Conversion boxes can take an older RGB video signal and convert /scale it for a modern digital HDMI display. The 5 Way HDMI Switch simply enables you to feed it 5 HDMI input connections and select which of them to output to one HDMI connection. This is essential with displays that have a limited number of HDMI inputs as well as highly covenant for switching between devices without having to bother with the display controls. The display can be set to one HDMI input and the source switching is facilitated by the 5 Way HDMI Video switch.

Direct: Commdore 64 to 1902A, it was hooked up to the 32″ display via the SCART Boxes, however, it is not at present. The SCART/Conversion boxes are left in place for flexibility in case I choose to use them later. The conversion boxes when in use are hooked to the 5Way HDMI Video switch. The Chameleon Cartridge has a VGA connector and that is hooked to the Dell Ultravision display. You can read more about the Chameleon card in other posts.
The Amiga 1200 is routed through the SCART/Conversion box via the HDMI In. The SCART/Conversion box is hooked to the 5Way Video Switch. The 5Way Video Switch allows 5 HDMI video inputs to be output one at a time to the 32″ Roku.

Note, the Amiga HDMI output could be directly hooked to the video switch, however, I also wanted a way to test the native Amiga RGB video output and this enables me to do both without unhooking and reconnecting cables, pure lazy man connivance!
The Amiberry and PC are directly connected to the 5 Way Video Switch. The MiSTer uses the second HDMI input on the Roku Display as its used very little right now.
Networking
The networking for the retro station is rather simple, the PC, MiSTer, Amiga’s, Pi are all connected to a 8 port switch. the switch is connected to a Firewall that isolates it all from the rest of my network but enables internet access.

KVM’s
KVM stands for “keyboard, video, mouse,” and allows you to control multiple computers from a single keyboard, mouse, and monitor.
In this case I am not using them for the monitor’s/display’s. I am using them to share some Keyboards and Mice. If you hadn’t thought about it until now, imagine if all those devices I am using had to have their own Keyboard and Mouse. Of course the original Amiga and 64C have their own Keyboards. The Amiga 1200 has its own mouse and game controller. The PC, Pi, MiSTer and Vampire share a couple of Mice and Keyboards. These are split across two KVMs. The hope some day is to only need one KVM, one mouse and one Keyboard. I think this will eventually be doable with some experimentation, trial and error. One keyboard mouse set is wireless. The other is wired and required for the Vampire since wireless USB hasn’t been created yet for the vampire.
The Desk
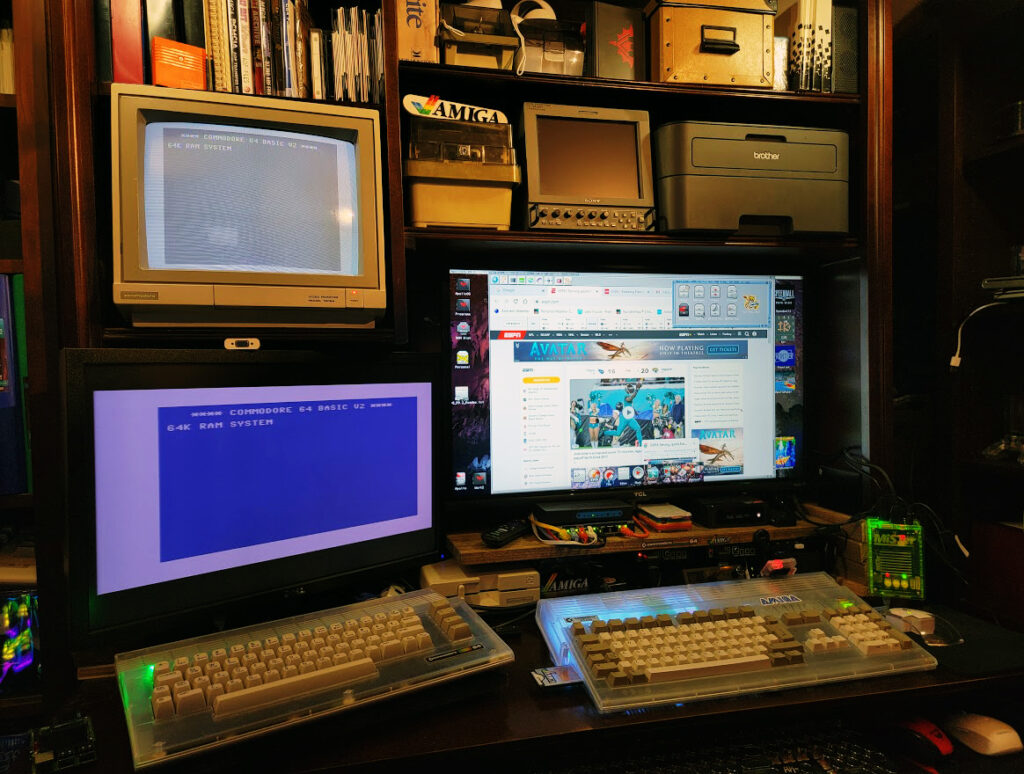
While probably not of great interest, the story wouldn’t be complete without talking about the desk a bit. As referenced earlier, the desk was simply a leftover from my past, then used in one of the girls bedrooms and now relegated to the basement with me. Its next stop will likely be a thrift store or worse the dump. I learned from building out my ham station over 10 years that designing a space is a mixture of what’s available, trial and error, patience and compromise. The desk met the cheap available part of the grand equation. This certainly put more weight on the other parts of the equation. by Measuring I knew I could get the Amiga and C64 on the desk. A modern TV was going to fit fairly easy as well. An older CDT was going to be a challenge. More stuff even more challenges.


The first concern was the TV height width. As you can see the desk has a shelf unit on it and I was immediately worried about the height. Also you can see it has a cabinet as well, so that was going to limit the width of whatever display I chose. The Roku was part compromise. one set of boards had to go under the shelf unit to raise it enough to accommodate the height.
If you look close you can see one thin board to raise the shelf enough to clear the Roku TV.
Next came the desire to get more stuff over in that space to reduce swivel chair and bleed over devices into my Ham Station area. The answer? More blocks under the shelf.
And then a shelf under the Roku so I could add the SCART conversion boxes, Video Switch, PI and other stuff.
This is where it stands today! 🙂 Eventually I will buy some better wood for the blocks and stain it to make this all look better. Also looming late next year are the Checkmate Retro Displays and that may require that the current shelf goes and a different solution including making the desk surface larger. I will still need a shelf of some sort as well so Phase 2 will be interesting.
There was a need to remove the cabinet door to stuff a monitor in there, some drilling (Yes, ugly!) lots of two sided velcro tape as well to position power strips and switches. All in all there is still a little bit of cleanup work to do. I have a lot of floppies I would like to put on the upper shelves and such. The Dell monitor was a late add in and (barely fits/doesn’t really fit).
So ending where I started, one more look at the finished result.


